Headlight Restoration in Calgary: Cost, Process & Results (2026)
Quick answer: Headlights go cloudy and yellow because their polycarbonate lenses lose the thin factory UV topcoat, and the bare plastic underneath then oxidises under sunlight. Calgary's high-altitude, high-sunshine climate accelerates that oxidation, which is why hazed headlights are so common on cars here.
Key Takeaways
- Headlights go cloudy and yellow because their polycarbonate lenses lose the thin factory UV topcoat, and the bare plastic underneath then oxidises under sunlight. Calgary's high-altitude, high-sunshine climate accelerates that oxidation, which is why hazed headlights are so common on cars here.
- Professional headlight restoration wet-sands away the oxidised layer through progressively finer grits, polishes the lens back to clarity, and — critically — seals it with a fresh UV coating. That last sealing step is what separates a lasting restoration from a toothpaste hack that hazes over again within months.
- Restoration is a fraction of the cost of replacement. A pair of OEM headlight assemblies often runs $500–$1,500+ once you add the labour to fit and aim them, while restoring the lenses you already have is far cheaper and takes a single appointment — so restoration is almost always the first thing to try.
- Clear headlights are a safety item, not just cosmetic: oxidised lenses scatter and dim your beam, cutting night-time visibility on dark Calgary roads. Restoration restores both the look of the car and the actual light output, which also matters when paint and detailing work makes everything else look new.
Cloudy, yellow headlights are the single fastest way to make an otherwise clean car look a decade older — and on dark Calgary roads they cut how far you can actually see at night. The good news is that the haze is almost always just on the surface of the lens, which means headlight restoration can bring it back to clarity for a fraction of the cost of new headlights. This guide covers why headlights cloud over in the first place, the proper wet-sand-and-seal process, real costs, how long it lasts, and the cases where restoration won't be enough.
The short answer: Headlights go cloudy because their plastic lenses lose the factory UV topcoat and the bare polycarbonate underneath oxidises in the sun — and Calgary's high-altitude, high-sunshine climate speeds that up. Restoration wet-sands off the oxidised layer, polishes the lens clear, and re-seals it with a fresh UV coating — that final seal is what makes the result last, and it's the step toothpaste hacks skip. It costs a small fraction of headlight replacement (often $500–$1,500+ per pair), takes one appointment, and restores both the look and your actual night-time light output. It only falls short when the lens is cracked or fogged from the inside.
Below we walk through the cause, the restore-vs-replace cost comparison, the step-by-step pro process, why the UV seal is the whole game, and when restoration simply won't work. Headlight restoration uses the same machine-polishing skillset as paint correction, so it's a natural add-on to a car detailing service in Calgary that makes the whole front end look new in one visit.
Why Headlights Go Cloudy and Yellow
Modern headlight lenses are made of polycarbonate — a tough, lightweight plastic that replaced glass decades ago because it resists shattering and can be moulded into the complex shapes today's headlights use. Polycarbonate has one weakness, though: on its own it degrades fast under ultraviolet light. To stop that, the factory sprays each lens with a thin, hard UV-resistant topcoat. That clear coat is the only thing keeping the lens crystal clear, and it is sacrificial — it wears and breaks down over years of sun exposure.
Once that factory UV coat fails, the bare polycarbonate underneath is exposed to sunlight and begins to oxidise. Oxidation roughens and yellows the surface at a microscopic level, which is what you see as cloudiness, haze, and that distinctive yellow-to-brown tint. The lens isn't dirty and it isn't a film you can wipe off — the top layer of the plastic itself has chemically degraded. This is also why Calgary is hard on headlights: the city gets some of the most annual sunshine of any major Canadian city and sits at over 1,000 metres of elevation, where UV intensity is higher. More UV means the factory coat fails sooner and the oxidation that follows sets in faster.
Restore vs. Replace: The Cost Comparison
The reason restoration is almost always the first thing to try is simple economics. The cloudiness lives on the outer surface of a lens you already own — restoration removes and re-seals that surface, where replacement throws away a perfectly good housing to buy a new one. Here is how the two stack up.
| Headlight Restoration | Headlight Replacement | |
|---|---|---|
| What it addresses | Surface haze, yellowing, oxidation | Cracks, internal fogging, broken housings |
| Relative cost | A small fraction of replacement | Often $500–$1,500+ per pair, fitted |
| Time | One appointment | Parts order + fit + re-aim |
| Keeps original assemblies | Yes | No |
| When it is the right call | Surface cloudiness (most cars) | Cracked, moisture inside, degraded reflector |
| Result | Lenses look essentially new | Brand-new assemblies |
A single OEM headlight assembly on its own commonly runs $250–$750, so a pair plus the labour to fit and re-aim them adds up quickly — frequently $500–$1,500 or more, and far higher on luxury vehicles with adaptive or LED matrix units. Restoring the lenses you already have sidesteps nearly all of that. Replacement only wins when the lens is genuinely damaged rather than just hazed — and as the last section covers, that is the minority of cases.
The Professional Restoration Process, Step by Step
A real restoration is methodical, and it is the opposite of a quick rub with a polish. The goal is to remove every bit of oxidised plastic evenly, bring the lens to full clarity, and then re-protect it. Here is how it runs in our Calgary studio.
Clean & Mask
Step 1The lens is washed and dried, then the surrounding paint and trim are carefully taped off so the abrasive steps only ever touch the headlight and never the clear coat around it.
Wet-Sand Through Grits
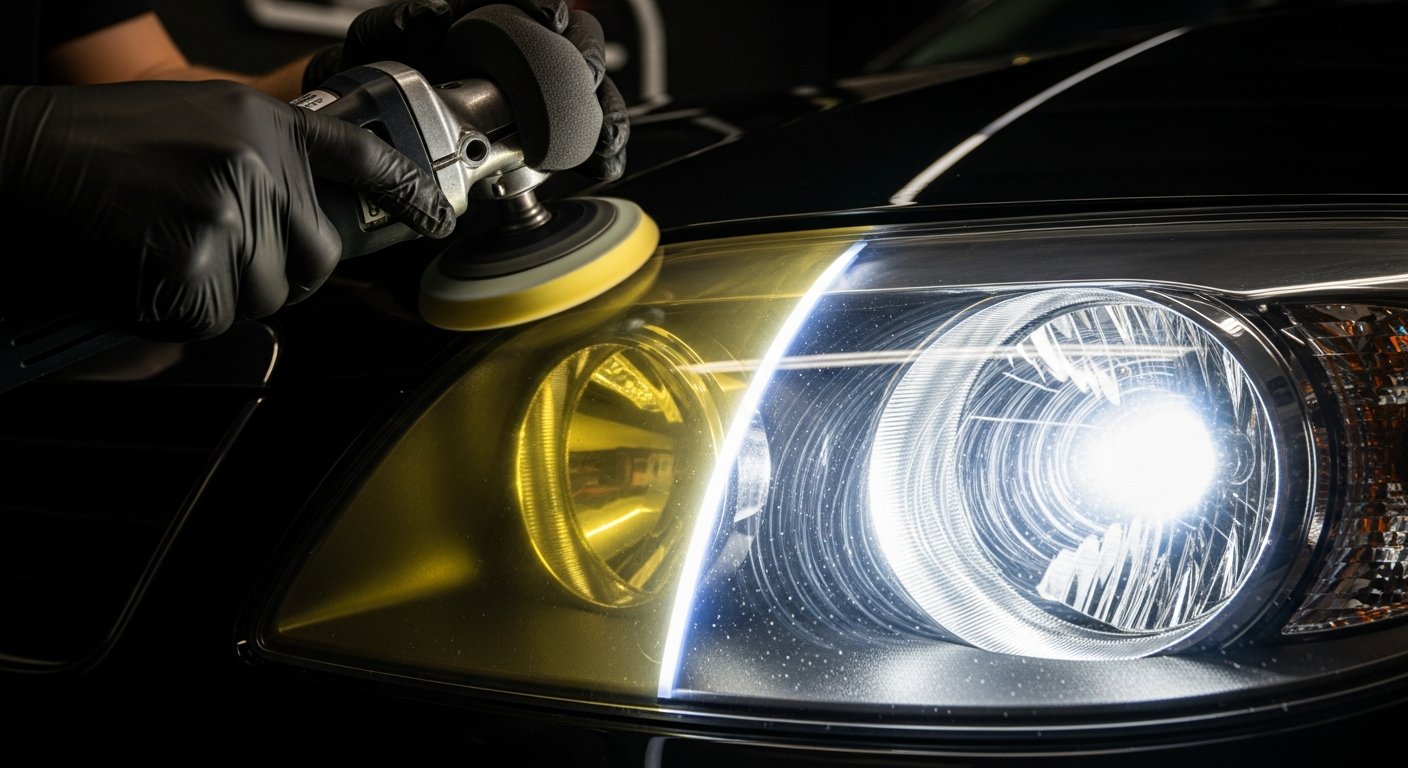
Step 2The oxidised layer is wet-sanded away using progressively finer sandpaper grits — starting coarse enough to cut through the yellowing, then stepping up to remove the scratches each previous grit left behind.
Machine Polish to Clarity
Step 3A machine polisher with a refining compound removes the fine sanding haze and brings the polycarbonate back to a clear, glassy finish — the same paint-correction skillset, applied to plastic.
Apply a UV Sealant
Step 4A fresh UV-resistant coating is applied to replace the failed factory topcoat. This is the step that makes the result last — without it, the bare lens would re-oxidise within months.
Cure & Inspect
Step 5The coating is cured and each lens is inspected for even clarity and full coverage before the tape comes off, so the finish is uniform and properly sealed edge to edge.
Why the UV Sealant Is the Whole Game
If you take one thing from this guide, make it this: the sealing step is what separates a restoration that lasts from one that hazes over in weeks. The clarity of a healthy headlight comes entirely from a protective UV coat. Restoration sands off the failed coat along with the oxidation underneath it — which leaves the polycarbonate bare. Polish it and it looks brilliant for the photo, but bare polycarbonate left in the sun starts oxidising again almost immediately. Without a new coating, you are right back to yellow within a few months, often faster under Calgary's strong UV.
Why the Toothpaste Trick Always Comes Back
Toothpaste is a mild abrasive, so it does polish a little oxidation off and a yellowed lens looks clearer for a few days. But it removes far too little to truly clear a hazed lens, and it puts no UV coating back on — so the bare plastic you exposed simply re-oxidises and clouds over again, often worse than before. The clarity isn't the hard part; making it stay is, and that takes a real sealant.
The Pros
- Professional restoration wet-sands away all the oxidation evenly, then re-seals with a durable UV coating — so the clarity actually lasts years.
- Costs a small fraction of new headlights and keeps your original, correctly-aimed assemblies.
- Restores real night-time light output, not just appearance — a genuine safety improvement.
- Pairs naturally with a detail or paint correction so the whole front end looks new in one visit.
The Cons
- Toothpaste and quick-polish hacks skip the UV seal, so the lens re-oxidises within weeks to a few months.
- DIY kits demand careful technique to avoid uneven sanding marks, and consumer-grade coatings rarely match professional durability.
- Restoration only addresses the lens surface — it cannot fix a cracked lens or moisture trapped inside the housing.
- A car parked in full sun year-round will haze sooner than a garage-kept one, sealant or not.
What It Costs in Calgary and How Long It Lasts
Headlight restoration is priced on condition: a lightly clouded pair that just needs polishing and a fresh seal sits at the low end, while deeply yellowed, pitted lenses need more wet-sanding stages and more time. In every case it is a small fraction of what new assemblies cost, which is why it is the sensible first move on any car where the haze is on the surface. Because the price tracks the actual state of your lenses, an honest shop looks at them in person before quoting — and often does the work alongside a detail so the whole front end is refreshed together.
What Drives Headlight Restoration Cost & Longevity (illustrative)
As for longevity, a restoration finished with a proper UV coating typically holds its clarity for a few years before the lenses begin to haze again, and a ceramic-grade headlight coating can extend that further. The two things that move it most are the quality of the seal and how the car lives — a garage-kept vehicle keeps its clear lenses far longer than one that bakes in full Calgary sun every day. Either way, it is the kind of refresh you do once every few years, not annually.
When Restoration Won't Work — and You Need Replacement
Restoration is the right answer for the surface cloudiness that affects the vast majority of headlights, but it has clear limits. It only ever touches the outer surface of the lens, so any problem that isn't on that surface is outside what it can fix. Replace rather than restore when:
- The lens is cracked. A crack is structural damage through the plastic, not surface haze — sanding and polishing cannot close it, and a crack lets moisture in.
- There's fogging or condensation inside the housing. If the cloudiness is on the interior surface of the lens, external restoration physically cannot reach it. Internal moisture usually means a failed seal on the assembly.
- The reflector behind the lens has degraded. When the silvered reflector bowl has burned, peeled, or gone dull, the lens can be perfectly clear and the light output still poor — that's an assembly issue.
- A mounting tab or housing is broken. If the unit won't mount or aim correctly, clarity is beside the point and the assembly needs replacing.
On a sun-faded Calgary car, the cloudiness is almost always external oxidation — the exact thing restoration is built to fix — so for most owners it's the first and only step needed. The honest approach is to have the lenses assessed so you know which camp yours fall into before spending anything. Because the work is the same machine-polishing discipline as our paint correction service, it slots neatly into a visit alongside detailing — and if you're weighing a fuller refresh, our guide to choosing the best car detailing studio in Calgary covers how to vet a shop before you hand over the keys, while our car detailing prices in Calgary page lays out where add-ons like this sit.
Clear Headlights, Better Night Vision
Bring your car to our Calgary studio and we'll assess whether your hazed headlights need a simple restoration or a replacement, then wet-sand, polish, and UV-seal them back to clarity — backed by 705+ reviews, a 4.9-star rating, and four Consumer Choice Awards. Often done right alongside a detail.
Get Your Headlight Restoration QuoteRestore Your Vehicle's Showroom Finish
Professional detailing services in Calgary
Serving Calgary and surrounding areas • Free Uber shuttle with every service
Frequently Asked Questions
Ready to Protect Your Vehicle?
Get a quote from Calgary's most trusted detailing studio. We use only the best materials and back our work with industry-leading warranties.
Get A QuoteRelated Intelligence
Car Detailing Cost in Calgary: 2026 Price Guide
How much does car detailing cost in Calgary? A transparent 2026 breakdown of every package — from $149 maintenance details to $1,299 ceramic-protection details — plus the vehicle-size and add-on pricing that changes your quote.
Best Car Detailing in Calgary: How to Choose a Studio (2026)
How to pick the best car detailing studio in Calgary in 2026: the seven-point checklist, real package tiers and prices, the red flags of a damaging detail, and the verifiable reviews and awards that separate a premium studio from a pop-up.
Mobile Car Detailing in Calgary: How It Works, What It Costs
Mobile car detailing in Calgary explained: what is included, what it costs, the water and power you need to provide, the winter limits, and when a controlled studio detail is the smarter call.